"3rd-Party DNS Setup" Email Sending Approach
This approach allows your SaaS service to send emails with the user's domain name, making the emails look more authentic.
How It Works:
- Configuration Sharing: Your SaaS service shares DNS configuration details with users. This includes settings for The fallback content to display on prerenderingandThe fallback content to display on prerendering.
- User Action: Users then update their domain's DNS settings with these values.
- Email Sending: With these DNS updates, your SaaS can send emails using the user's domain in the sender address. As the user configures their DNS with your DKIM and SPF values, emails sent by your server will look authentic to the recipients.
Pros:
- Authenticity: Emails appear genuine to recipients and successfully pass SPF/DKIM validation checks.
- Simplified Infrastructure: The setup is straightforward. You use a single email-sending system for all your customers, only changing the sender name and address for each email. There's no need for complex software or unique services for individual users.
- Vendor Flexibility: This method often works well with existing email-sending services used for transactional emails.
Cons:
- DNS Complexity: Changing DNS settings can be confusing for those not familiar with it.
- Admin Access Needed: Only people with domain admin rights can change the necessary records.
- Knowledge Gap: Smaller businesses may not know their DNS provider or how to change settings.
- Different Setups: DNS setup steps vary across providers, like Cloudflare and AWS Route53, which have different expectations for TXT records, making tutorial creation challenging.
Required DNS Fields for Email Configuration
When integrating email sending into your SaaS platform, it's essential to understand the different DNS configurations available and their implications. Here's a breakdown of the two primary DNS fields associated with email sending: SPF and DKIM.
SPF (Sender Policy Framework)
SPF helps prevent email spoofing, but setting it up can be complex:
- Complexity: SPF setup can be intricate. Unlike DKIM, where you typically add a new record, SPF requires modifying an existing record. This can be challenging, especially for those unfamiliar with DNS configurations.
- Potential for Errors: Small mistakes, such as adding multiple whitespaces or misplacing identifiers, can lead to SPF setup errors. For an average small business owner, incorrect SPF configurations can often result in email delivery issues.
- Less Useful with VERP: When using The fallback content to display on prerendering-based sending, SPF's importance is reduced because VERP uses a different sending domain.
DKIM (DomainKeys Identified Mail)
DKIM lets recipients check if an email is really from the domain's owner. Here's how to set it up:
Setup DKIM Key: Begin by setting up a DKIM key within your email infrastructure. This will be a TXT record. While traditionally, the
_domainkeysubdomain is used, you can choose any subdomain because we will not be using this record directly but as a CNAME target. In our example, we'll usecustomers-dkim.example.comfor the shared public key.$ dig txt customers-dkim.example.com
;; ANSWER SECTION:
customers-dkim.example.com. 217 IN TXT "v=DKIM1; k=rsa; p=MIIBIjANBgkqhki..."
This tutorial assumes you have the DKIM keys already generated and configured in your sending infrastructure. If you do not have DKIM keys, you can generate these with the following commands:
$ openssl genrsa -out dkim_private.pem 2048
$ echo -n 'v=DKIM1; p=' > dkim_dns.txt
$ openssl rsa -in dkim_private.pem -pubout -outform der 2>/dev/null | openssl base64 -A >> dkim_dns.txt
The resulting file dkim_private.pem contains the private key needed for signing emails, and dkim_dns.txt contains the DNS TXT record value.
CNAME Record for DKIM Selector: Instruct your users to set up a CNAME record for the DKIM selector. The selector should be consistent and unlikely to change in the future. In our example, we use
my-saasas the selector. So, for a domain likecustomer.com, the CNAME would bemy-saas._domainkey.customer.com, pointing to your shared DKIM recordcustomers-dkim.example.com.When you query the DKIM key for the customer's domain using your selector, you should retrieve your public DKIM key.
$ dig txt my-saas._domainkey.customer.com
;; ANSWER SECTION:
my-saas._domainkey.customer.com. 300 IN  CNAME   customers-dkim.example.com.
customers-dkim.example.com.  217 IN  TXT "v=DKIM1; k=rsa; p=MIIBIjANBgkqhki..."
When sending out emails on behalf of the customer, sign the emails with DKIM using the customer's domain name and the configured selector my-saas.
Setting Up VERP Domain for Bounce Handling
When integrating email sending into your SaaS platform, handling bounced emails efficiently is crucial. VERP (Variable Envelope Return Path) offers a sophisticated method to manage these bounces. Here's a step-by-step guide to setting up a VERP domain:
1. MX Server Configuration:
To utilize VERP addresses, you'll need an MX server dedicated to processing bounce emails. This server should:
- Operate on port 25.
- Listen for incoming SMTP connections.
- On receiving an email, check if the recipient's address aligns with a VERP address.
- If it matches, determine the original email to which the bounce was sent in response.
- Ascertain if the response is an out-of-office reply or an actual bounce email.
For those familiar with Node.js, the SMTP-Server module can simplify the creation of SMTP servers.
2. VERP Domain Configuration:
For VERP to function, users need to set up a CNAME record for a subdomain, pointing to your VERP domain. This delegation allows your SaaS to manage the subdomain. For instance, if your VERP domain is bounces.example.com and the user's domain is customer.com, the user should set a CNAME for my-service.customer.com pointing to bounces.example.com. Ensure that your VERP domain has an MX DNS record, as this is where bounce replies are directed.
$ dig my-service.customer.com
;; ANSWER SECTION:
my-service.customer.com.    180 IN  CNAME   bounces.example.com.
bounces.example.com.    60  IN  A   1.2.3.4

$ dig mx my-service.customer.com
;; ANSWER SECTION:
my-service.customer.com.    180 IN  CNAME   bounces.example.com.
bounces.example.com.    300 IN  MX  10 customer-mail.example.com.
3. Email Sending with VERP:
When dispatching emails on behalf of users:
- Generate a unique identifier for each email.
- Use the customer's VERP domain as the domain name.
- For instance, using UUID values, the sender address could be
9b689fbe-3d95-45f1-9a6c-8817d1e80bde@my-service.customer.com. - Store this UUID in your database alongside the email's details.
4. Handling Bounces:
If an email bounces:
- The managing MTA server sends a bounce email to the sender address.
- This resolves the MX of
my-service.customer.comtocustomer-mail.example.com, where your VERP handling SMTP server operates. - Your VERP handler checks the database for the UUID. If found, your service can identify the specific user and email that bounced.
Examples
The following screenshots illustrate the process of configuring a provider's DNS settings from the user's perspective. If you're integrating email sending into your SaaS platform, guiding your users through a similar setup will be essential for smooth email operations.
Mailchimp
Configuring DNS settings with Mailchimp is a straightforward process. As illustrated in the following screenshots, Mailchimp requires users to set a few CNAME records. Once configured, these CNAME records automatically resolve into the necessary DKIM records.
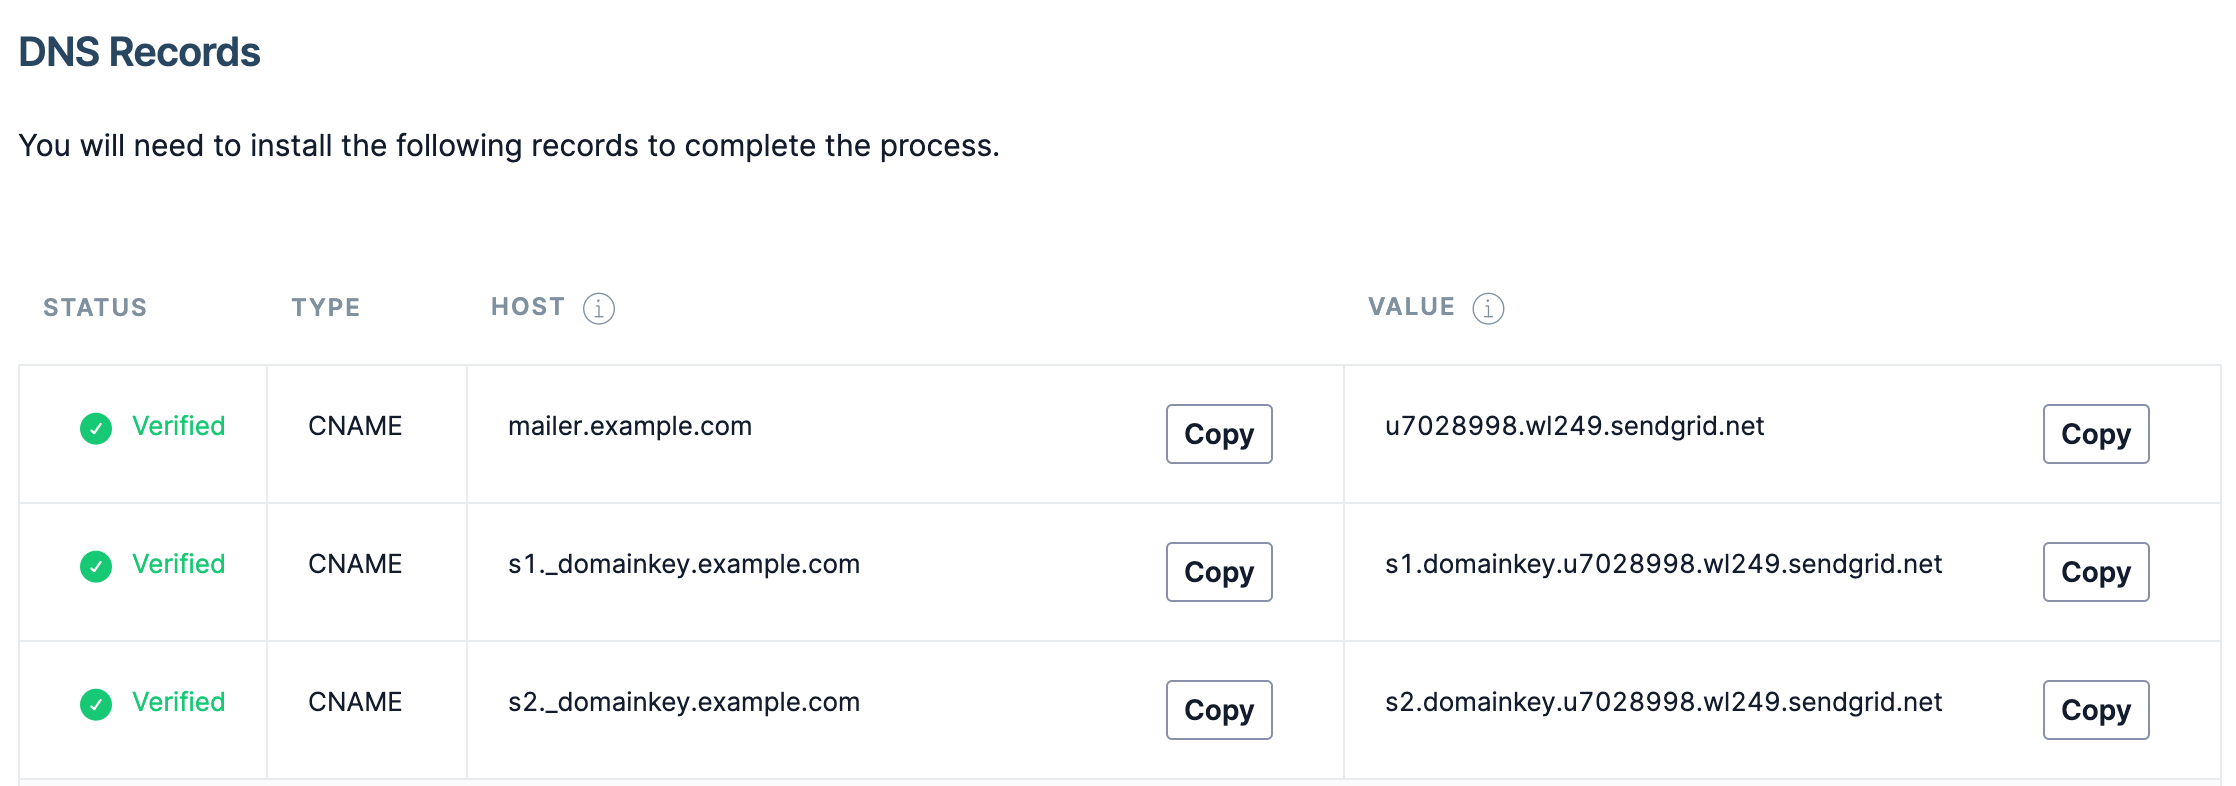
SendGrid
Configuring DNS settings with SendGrid involves a few more steps compared to Mailchimp. SendGrid not only requires the setup of DKIM CNAME records but also an additional CNAME record. This specific CNAME is utilized by SendGrid as the sending domain for VERP addresses. Once set up, this CNAME record resolves into an A record, an MX record, and an SPF record.
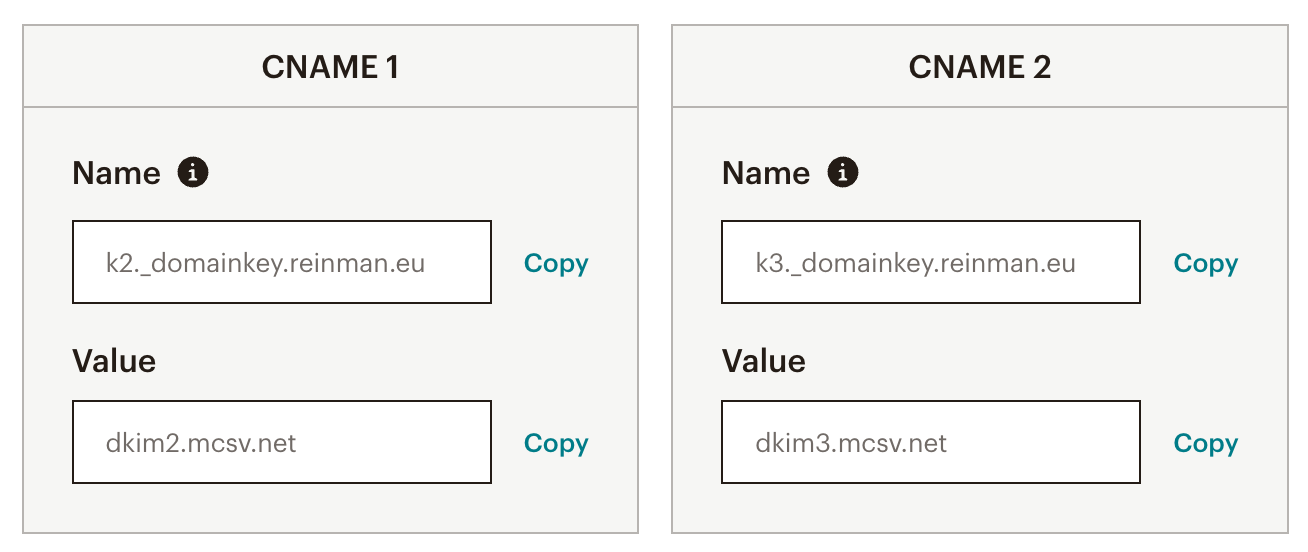
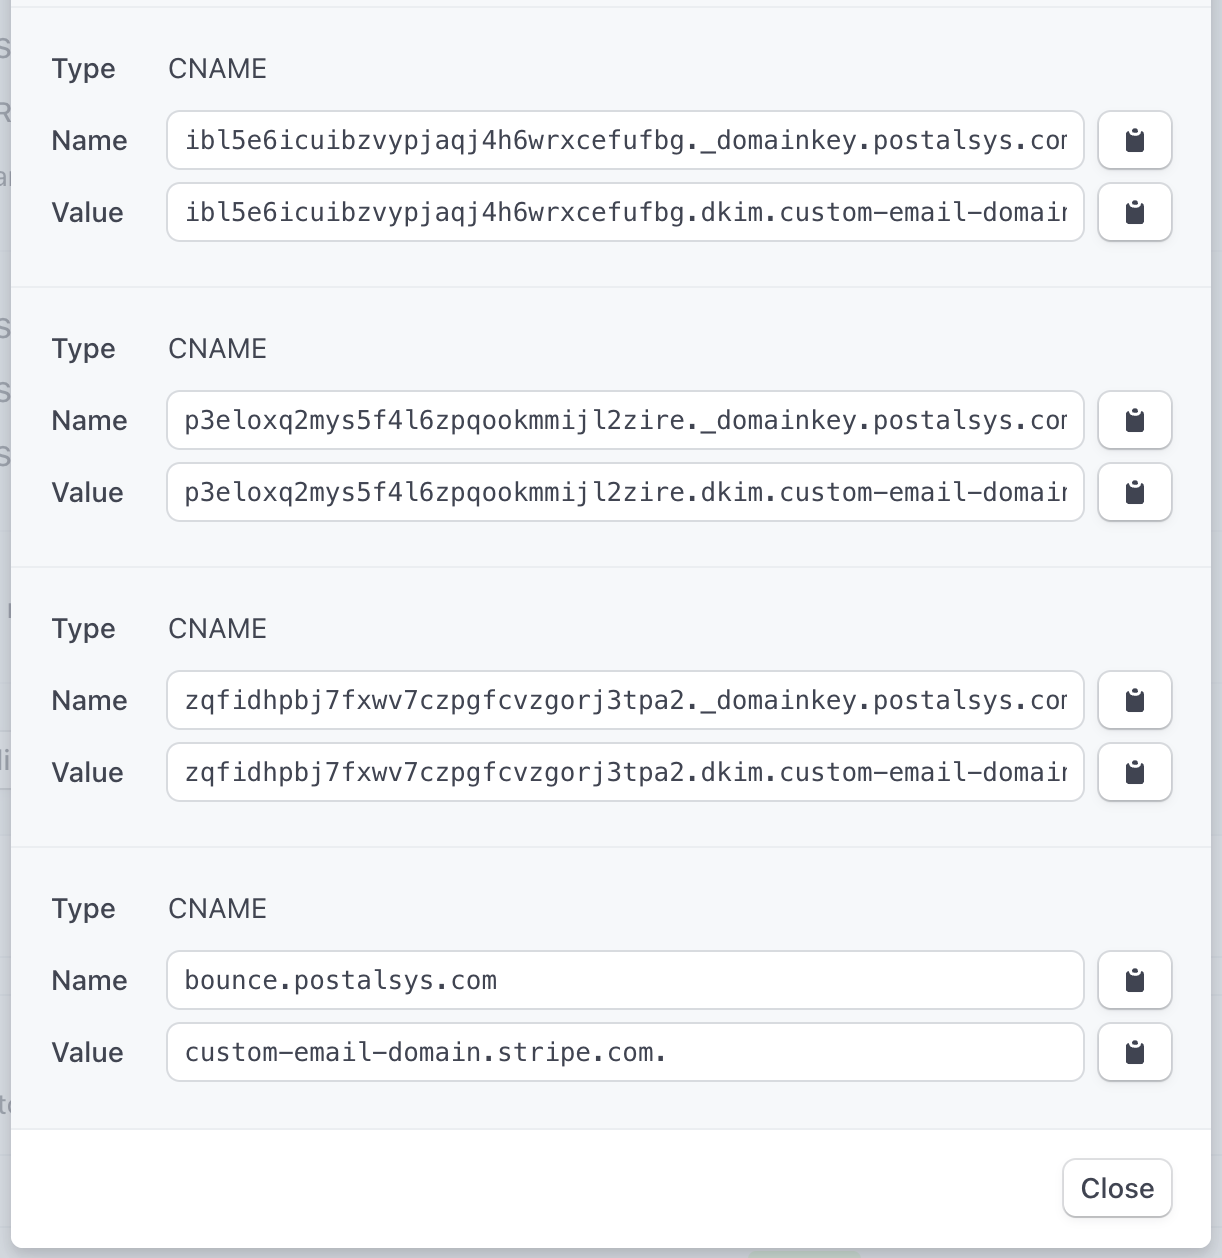
Stripe
At first glance, Stripe's DNS configuration process might seem more intricate compared to simpler setups like Mailchimp or SendGrid. However, upon closer inspection, the complexity can be broken down into understandable components:
Domain Verification: One of the standout features in Stripe's setup is the domain verification field. This is a security measure to ensure that the domain being configured is genuinely owned by the user, preventing potential malicious activities.
Multiple DKIM CNAME Entries: Stripe diverges from the norm by requiring not just 2 but 6 DKIM CNAME entries. The exact reason for this increased number isn't explicitly detailed by Stripe. It might be related to enhanced security, redundancy, or specific technical intricacies of their email infrastructure.
Bounce Handler Entry: Similar to SendGrid, Stripe also has a configuration for handling bounced emails. This ensures that the sender is notified of any undelivered emails, allowing for better email management.

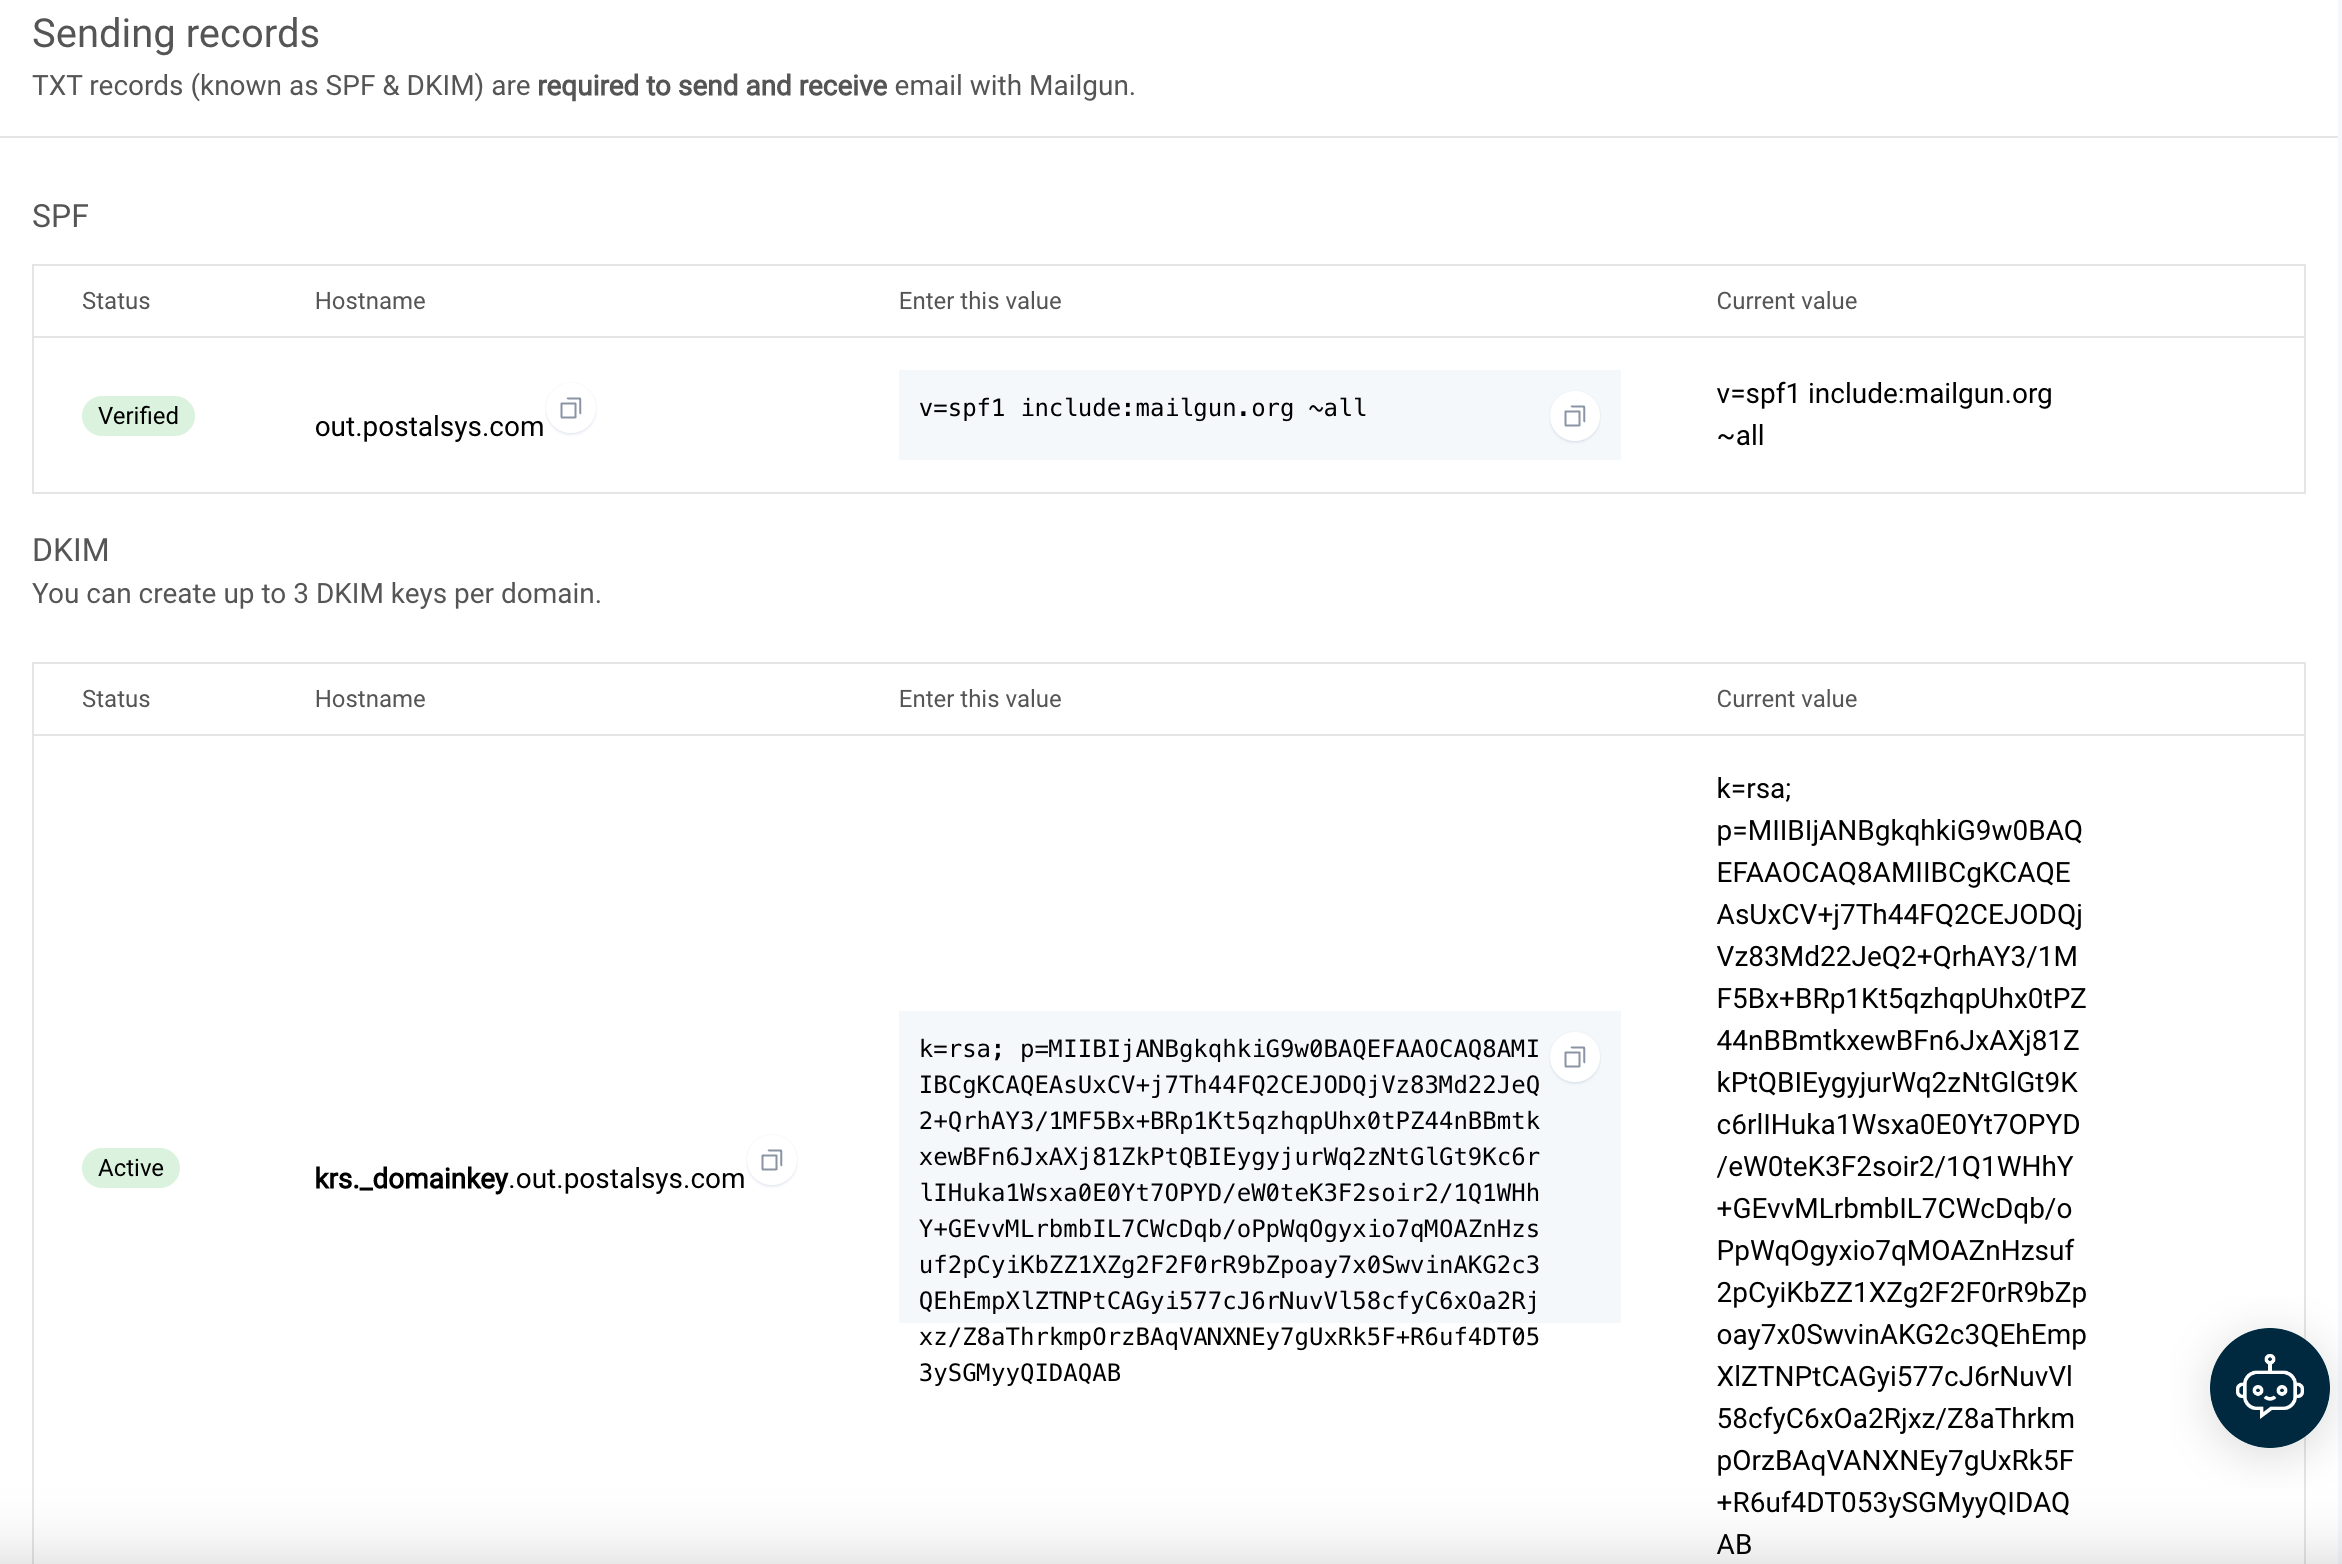
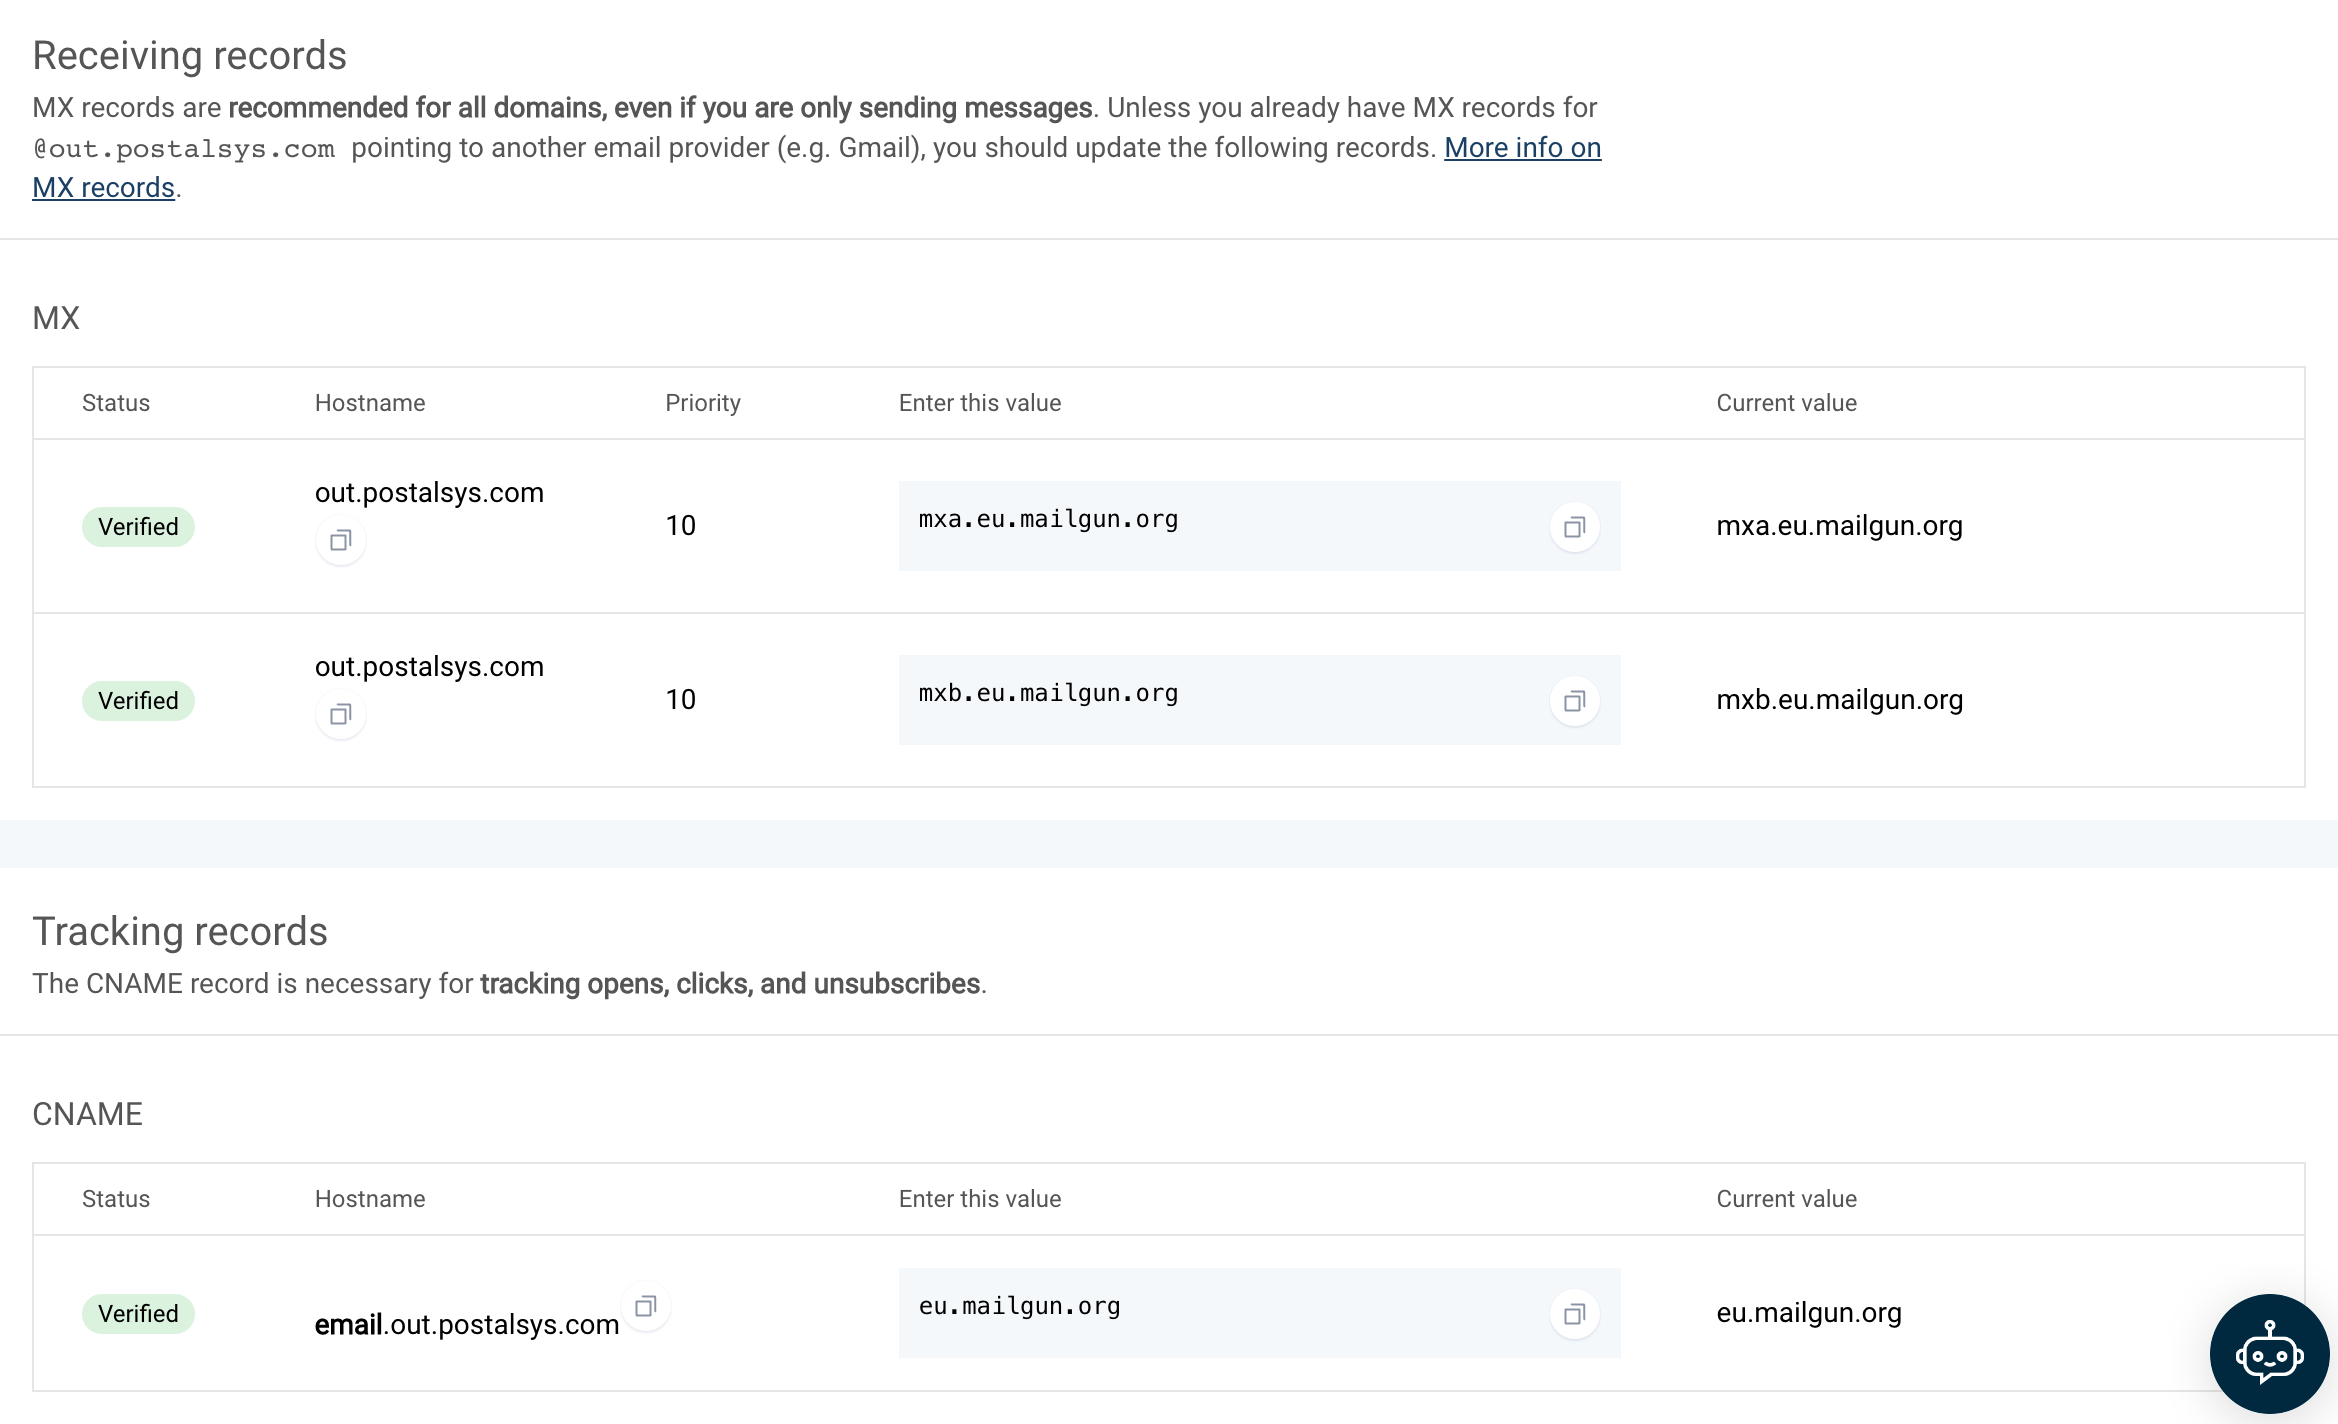
Mailgun
Mailgun's approach to DNS configuration stands out from other providers due to its unique method of setting DNS records. Instead of configuring records for the main domain (e.g., *.example.com), Mailgun directs users to set up records for a subdomain (e.g., *.out.example.com).
Key Points:
Subdomain Configuration: By focusing on a subdomain, Mailgun allows for a separation between the main domain's email activities and the emails sent through their platform. This can be beneficial for organizations that want to keep transactional or marketing emails distinct from their primary email communications.
Potential Pitfalls: While this approach is technically sound, it comes with its set of challenges. There's a risk of misconfiguration, especially if users inadvertently set up records that are either invalid or conflict with the main domain's settings. Such mistakes can lead to email delivery issues or other unforeseen complications.
Flexibility for Providers: For those well-versed in DNS configurations, Mailgun's method offers a high degree of flexibility. By operating on a subdomain, Mailgun can implement specific features or changes without affecting the main domain's email operations.